
Overview of the Lesson
This lesson starts with teaching the powerful techniques to avoid overfitting and decrease training time.:
- Dropout: remove activations at random during training in order to regularize the model
- Data augmentation: modify model inputs during training in order to effectively increase data size
- Batch normalization: adjust the parameterization of a model in order to make the loss surface smoother.
Next the lesson teaches convolutions, which can be thought of as a variant of matrix multiplication with tied weights, and are the operation at the heart of modern computer vision models (and, increasingly, other types of models too).
This knowledge is then used to create a class activated map, which is a heat-map that shows which parts of an image were most important in making a prediction.
Finally, the lesson ends with data ethics.
Table of Contents
Platform.ai - Assisted Image Labeling
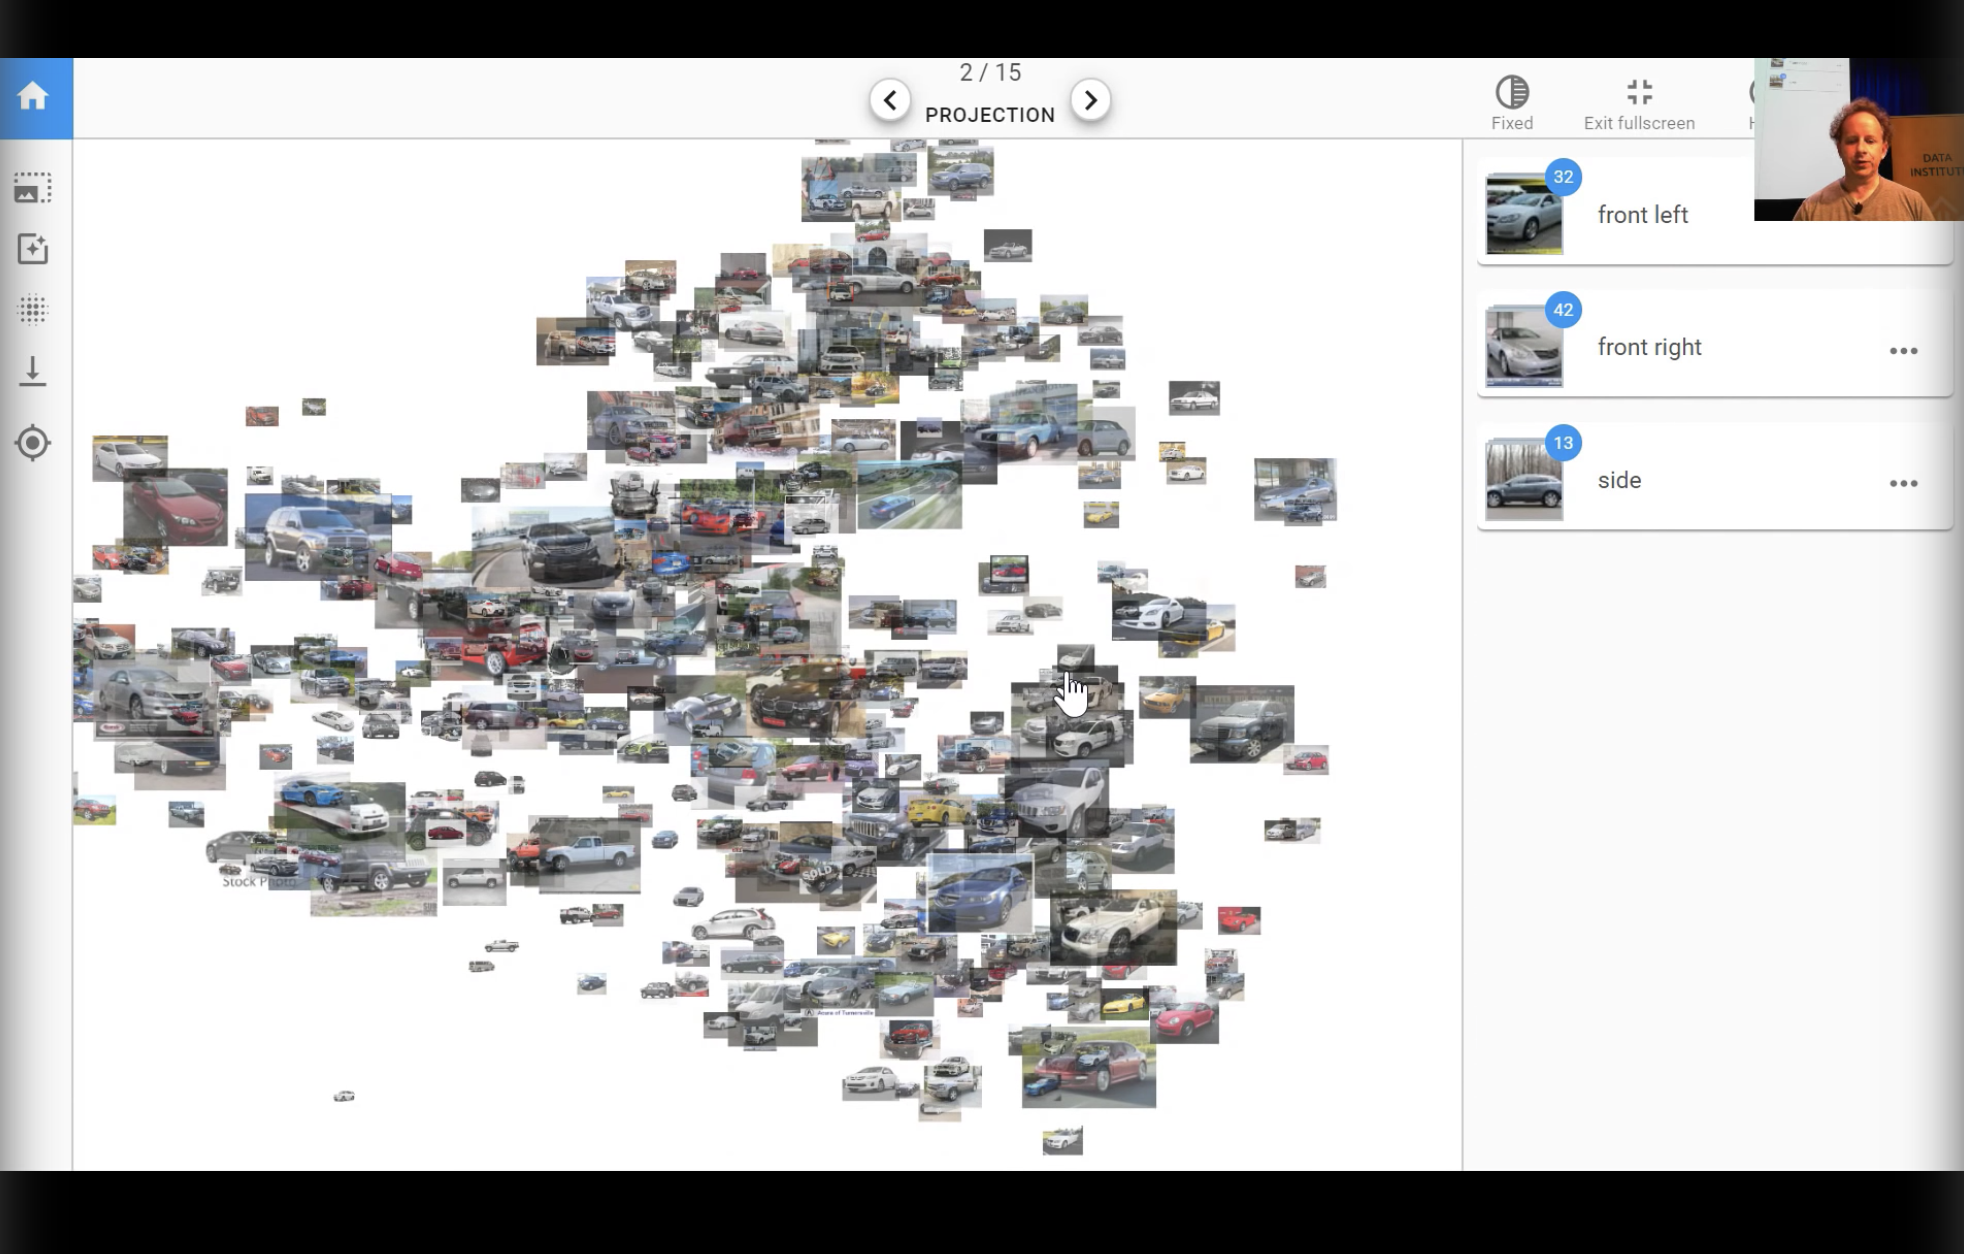
- Jeremy showed in his TED talk in 2015 a cool demo where you can ‘collaborate’ with a pretrained neural network to label an unlabeled image dataset.
- Basically it is a UI where the images are projected from the network into a 2D space (via T-SNE or similar). If the model is trained well then there will be good separation between the images in this space.
- It is an iterative process where the user labels a few images, the network trains with these labels, the network then guesses the labels, and the user can correct these and label more images. Repeat.
- Platform.ai is a product brought out by Jeremy that lets you do with your own image dataset that you upload.
- This is similar to active learning.
Tabular Data: Deep Dive
We want to understand every line of the code of TabularModel:
class TabularModel(Module):
    "Basic model for tabular data."
    def __init__(self, emb_szs:ListSizes, n_cont:int, out_sz:int, layers:Collection[int], ps:Collection[float]=None,
                 emb_drop:float=0., y_range:OptRange=None, use_bn:bool=True, bn_final:bool=False):
        super().__init__()
        ps = ifnone(ps, [0]*len(layers))
        ps = listify(ps, layers)
        self.embeds = nn.ModuleList([embedding(ni, nf) for ni,nf in emb_szs])
        self.emb_drop = nn.Dropout(emb_drop)
        self.bn_cont = nn.BatchNorm1d(n_cont)
        n_emb = sum(e.embedding_dim for e in self.embeds)
        self.n_emb,self.n_cont,self.y_range = n_emb,n_cont,y_range
        sizes = self.get_sizes(layers, out_sz)
        actns = [nn.ReLU(inplace=True) for _ in range(len(sizes)-2)] + [None]
        layers = []
        for i,(n_in,n_out,dp,act) in enumerate(zip(sizes[:-1],sizes[1:],[0.]+ps,actns)):
            layers += bn_drop_lin(n_in, n_out, bn=use_bn and i!=0, p=dp, actn=act)
        if bn_final: layers.append(nn.BatchNorm1d(sizes[-1]))
        self.layers = nn.Sequential(*layers)

    def get_sizes(self, layers, out_sz):
        return [self.n_emb + self.n_cont] + layers + [out_sz]

    def forward(self, x_cat:Tensor, x_cont:Tensor) -> Tensor:
        if self.n_emb != 0:
            x = [e(x_cat[:,i]) for i,e in enumerate(self.embeds)]
            x = torch.cat(x, 1)
            x = self.emb_drop(x)
        if self.n_cont != 0:
            x_cont = self.bn_cont(x_cont)
            x = torch.cat([x, x_cont], 1) if self.n_emb != 0 else x_cont
        x = self.layers(x)
        if self.y_range is not None:
            x = (self.y_range[1]-self.y_range[0]) * torch.sigmoid(x) + self.y_range[0]
        return x
Model
The model for a tabular learner in fastai is like this one (source):
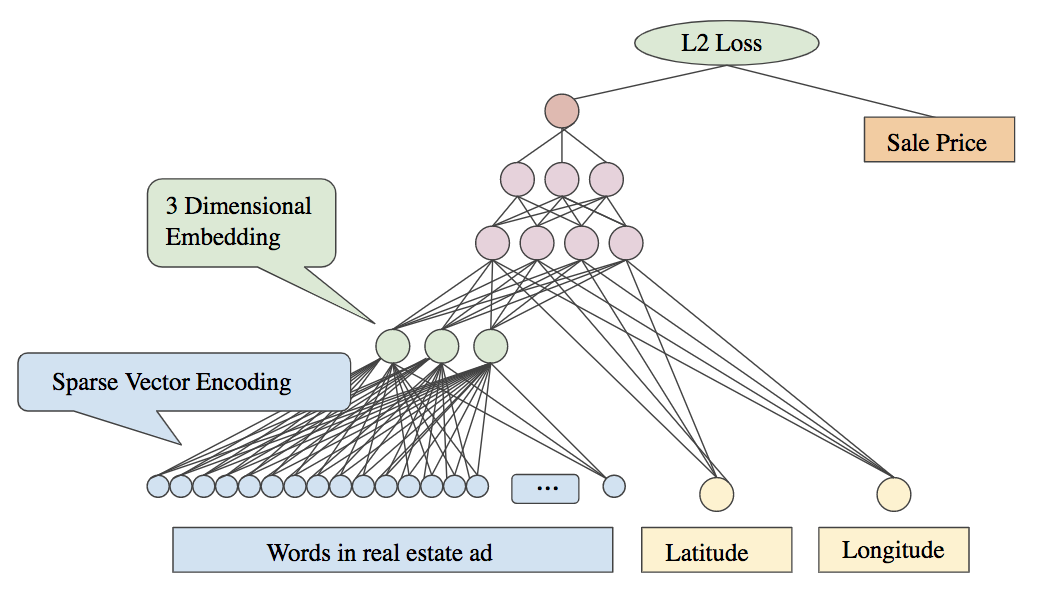
In this model there is a categorical variable: words in real estate ad and there are two continuous variables: latitude and longitude.
The words in a real estate ad can be represented as a sparse vector of the word counts in the text. The network learns a lower dimensional embedding for these words as shown as the green layer in the diagram.
In pink is the actual ML model: it’s a simple multi-layer perceptron. After the categorical variables have been encoded by their embedding layers, these vectors are catted together along with the continuous variables to make one big vector; this is the input to the MLP. That’s all there is to the tabular learner.
In the fastai the code to create the tabular learner is:
learn = tabular_learner(data,
                        layers=[1000,500],
                        ps=[0.001,0.01],
                        emb_drop=0.04,
                        y_range=y_range,
                        metrics=exp_rmspe)
What do these parameters mean?
-
layersis a list of ints, which specify the size of each of the layers in the MLP. Here it has two layers of size 1000 and 500 respectively. -
Now the intermediate weight matrix is going to have to go from a 1000 activation input to a 500 activation output, which means it’s going to have to be 500,000 elements in that weight matrix. That’s an awful lot for a data set with only a few hundred thousand rows. So this is going to overfit, and we need to make sure it doesn’t. The way to make sure it doesn’t is to use regularization; not to reduce the number of parameters.
-
One way to do that will be to use weight decay which fast.ai will use automatically, and you can vary it to something other than the default if you wish. It turns out in this case, we’re going to want more regularization.
-
The parameter
psprovides something called dropout. -
Also the parameter
emb_dropprovides dropout to just the embeddings.
Dropout
Dropout is a kind of regularization. This is the dropout paper.
The diagram from the paper illustrates perfectly what is going on:
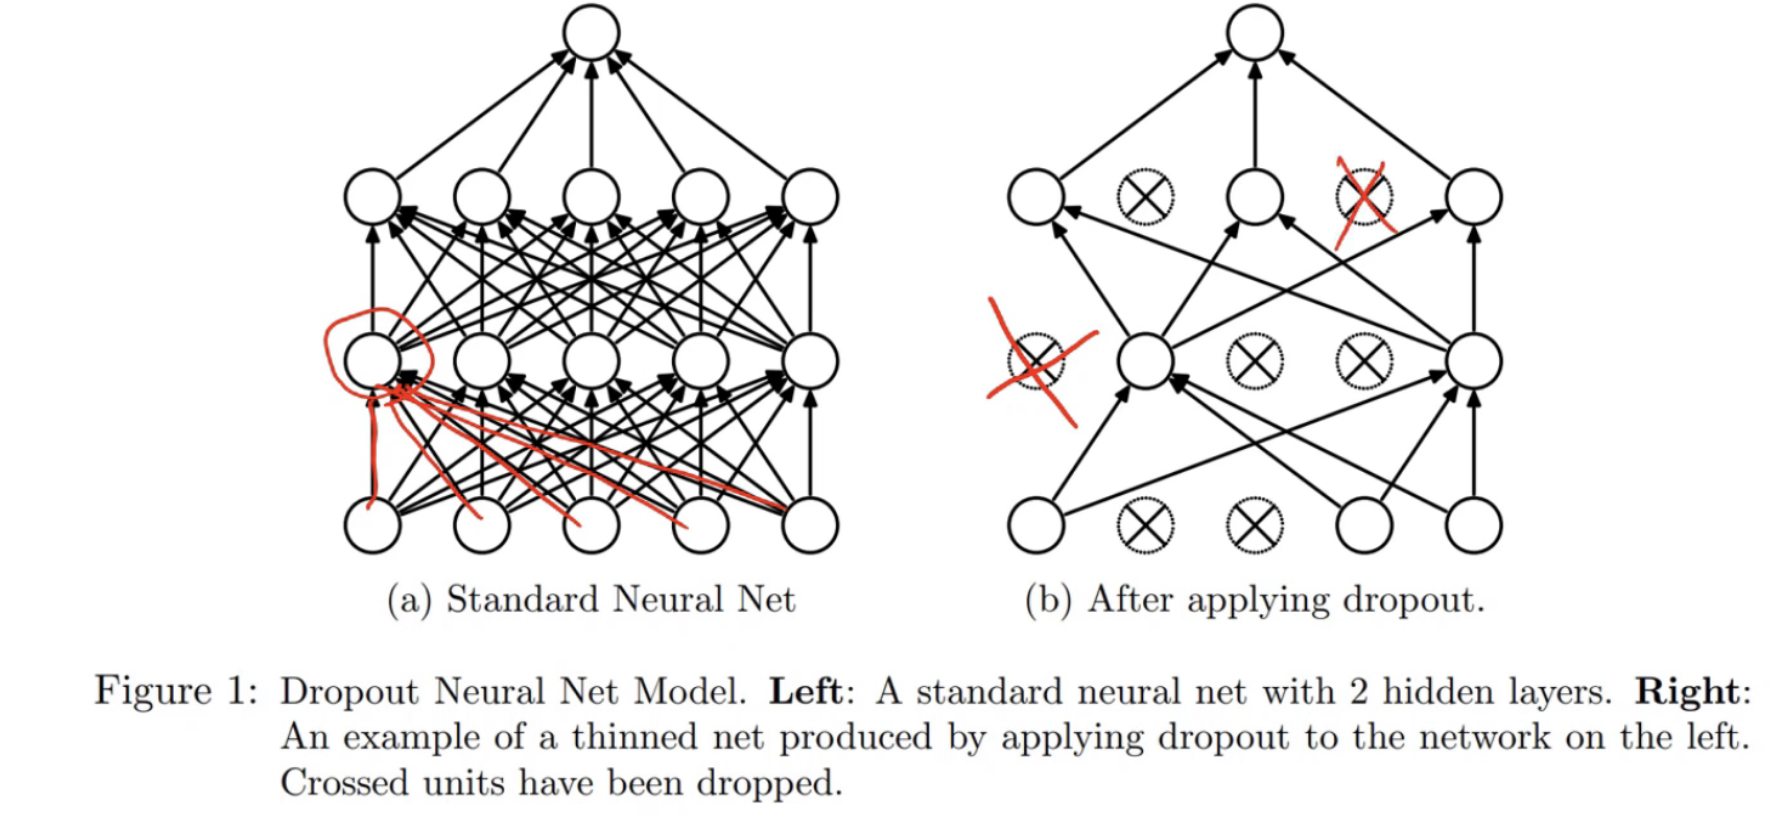
For dropout, we throw that away. At random, we throw away some percentage of the activations.
N.B. it doesn’t zero the weights/parameters. (Remember, there’s only two types of layer in a neural net - parameters and activations).
We throw each one away with a probability p. A common value of p is 0.5.
It means that no one activation can memorize some part of the input because that’s what happens if we over fit. If we over fit, some part of the model is basically learning to recognize a particular image rather than a feature in general or a particular item. This forces the network to use more neurons to determine the outcome and so the network is more likely to learn the actual patterns in the data, rather than trying to short-circuit the problem by memorizing the data.
During backpropagation, the gradients for the zeroed out neurons are also zero.
Check out this quote from one of the creators, Geoffry Hinton:
I went to my bank. The tellers kept changing and I asked one of them why. He said he didn’t know but they got moved around a lot. I figured it must be because it would require cooperation between employees to successfully defraud the bank. This made me realize that randomly removing a different subset of neurons on each example would prevent conspiracies and thus reduce overfitting.
Dropout stops your neural network from conspiring against you! Dropout is a technique that works really well, and has become standard practice in training neural networks.
In fastai nearly every learner has a parameter ps for defining how much dropout to use (number between 0 and 1).
Dropout: Training versus test time:

There is an interesting feature of dropout regarding training time and test time (AKA inference time). Training time is when we’re actually updating the weights - doing backpropagation etc. During training time, dropout works the way we just saw.
At test time however we turn off dropout. We’re not going to do dropout anymore because we want it to be as accurate as possible. It’s not updating any weights at test time so overfitting obviously isn’t an issue. But there is a small issue here. If previously p was set to 0.5, then half the activations were being removed. Which means when we turn them all back on again, now our overall activation level is twice what it used to be. Therefore, in the paper, they suggest multiplying all of the weights affect by dropout at test time by p.
You could alternatively scale things at training time instead, except you would scale the activations and gradients of the non-zeroed neurons by $\frac{1}{1-p}$ . (Source).
Dropout in Tabular Learner
Looking again at the tabular learner:
learn = tabular_learner(data,
                        layers=[1000,500],
                        ps=[0.001,0.01],
                        emb_drop=0.04,
                        y_range=y_range,
                        metrics=exp_rmspe)
In this case:
- Dropout of 0.001 on layer 1.
- Dropout of 0.01 on layer 2.
- Then some dropout of 0.04 on the embedding layers.
What is the embedding dropout actually doing? Look at the source code of the forward method again specifically at the embedding part:
def forward(self, x_cat:Tensor, x_cont:Tensor) -> Tensor:
    if self.n_emb != 0:
        x = [e(x_cat[:,i]) for i,e in enumerate(self.embeds)]
        x = torch.cat(x, 1)
        x = self.emb_drop(x)
    ...
- It calls each embedding
- It concatenates the embeddings in a single matrix (batch of vectors)
- It calls dropout on that
The output of an embedding layers is basically a big vector so we can think of it as just another layer in the neural network and so just call dropout on that like we normally would.
Here is the TabularModel for the Rossmann dataset:
TabularModel(
  (embeds): ModuleList(
    (0): Embedding(1116, 50)
    (1): Embedding(8, 5)
    (2): Embedding(4, 3)
    (3): Embedding(13, 7)
    (4): Embedding(32, 17)
    (5): Embedding(3, 2)
    (6): Embedding(26, 14)
    (7): Embedding(27, 14)
    (8): Embedding(5, 3)
    (9): Embedding(4, 3)
    (10): Embedding(4, 3)
    (11): Embedding(24, 13)
    (12): Embedding(9, 5)
    (13): Embedding(13, 7)
    (14): Embedding(53, 27)
    (15): Embedding(22, 12)
    (16): Embedding(7, 4)
    (17): Embedding(7, 4)
    (18): Embedding(4, 3)
    (19): Embedding(4, 3)
    (20): Embedding(9, 5)
    (21): Embedding(9, 5)
    (22): Embedding(3, 2)
    (23): Embedding(3, 2)
  )
  (emb_drop): Dropout(p=0.04)
  (bn_cont): BatchNorm1d(16, eps=1e-05, momentum=0.1, affine=True, track_running_stats=True)
  (layers): Sequential(
    (0): Linear(in_features=229, out_features=1000, bias=True)
    (1): ReLU(inplace)
    (2): BatchNorm1d(1000, eps=1e-05, momentum=0.1, affine=True, track_running_stats=True)
    (3): Dropout(p=0.001)
    (4): Linear(in_features=1000, out_features=500, bias=True)
    (5): ReLU(inplace)
    (6): BatchNorm1d(500, eps=1e-05, momentum=0.1, affine=True, track_running_stats=True)
    (7): Dropout(p=0.01)
    (8): Linear(in_features=500, out_features=1, bias=True)
  )
)
There are 24 categorical variables and so 24 embedding layers. Embedding(53, 27) means that there are 52+1 possible values (+1 is #na#) and the size of the embedding is 27D.
There are also these extra layers in there BatchNorm1d too. These are batch normalization, another standard regularization technique.
Batch Normalization
Batch norm is a very high impact training technique that was published in 2015.
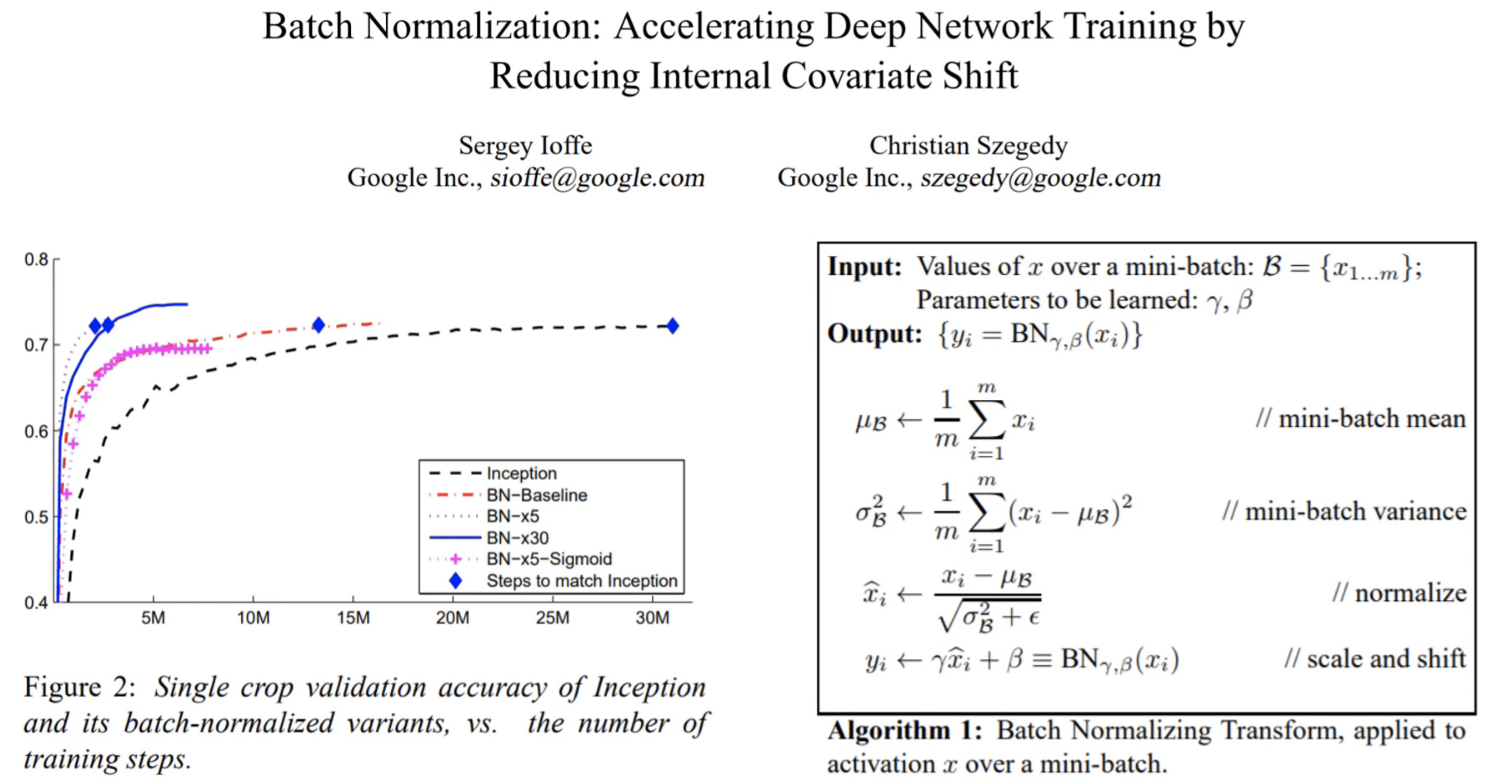
Showing the current then state of the art ImageNet model Inception. This is how long it took them to get a pretty good result, and then they tried the same thing with batch norm, and it was a lot faster.
From the abstract of the original paper:
Training Deep Neural Networks is complicated by the fact that the distribution of each layer’s inputs changes during training, as the parameters of the previous layers change. This slows down the training by requiring lower learning rates…
Batch Normalization layer adjusts the distribution of the output of a layer by controlling the the first two moments of the layer distributions (mean and standard deviation). This allows networks to be trained with a higher learning rate (so they train faster) and with more layers.
The algorithm:

You have the activations from the layer $x$ going into the batch norm layer.
- The first thing we do is we find the mean with those activations - sum divided by the count that is just the mean.
- The second thing we do is we find the variance of those activations - a difference squared divided by the mean is the variance.
- Then we normalize - the values minus the mean divided by the standard deviation is the normalized version. It turns out that bit is actually not that important. We used to think it was - it turns out it’s not. The really important bit is the next bit.
- We take those values and we add a vector of biases (they call it beta here). We’ve seen that before. We’ve used a bias term before. So we’re just going to add a bias term as per usual. Then we’re going to use another thing that’s a lot like a bias term, but rather than adding it, we’re going to multiply by it. These are the parameters gamma $\gamma$ and beta $\beta$ which are learnable parameters.
Basically $\gamma$ and $\beta$ are biases. $\beta$ is just a normal bias layer and $\gamma$ is a multiplicative/scale bias layer. They are parameters and so they are learned with gradient descent.
Roughly speaking, this works by scaling a layer’s output to the size and location it needs to be in (like between 0 and 5 for a movie review). This is harder to do with just stacks of non-linear functions because of all the intricate interactions between them. Navigating that complex landscape is hard and there will be many bumps in the road.
There is one more aspect to batch norm - momentum:
BatchNorm1d(500, eps=1e-05, momentum=0.1, affine=True, track_running_stats=True)
This has nothing to do with momentum in optimization. This is momentum as in exponentially weighted moving average. Specifically this mean and standard deviation (in batch norm algorithm), we don’t actually use a different mean and standard deviation for every mini batch. If we did, it would vary so much that it be very hard to train. So instead, we take an exponentially weighted moving average of the mean and standard deviation.
Why Batch Normalization works is actually still a debated topic.
In the original paper they said it accelerates training by reducing something they call ‘internal covariate shift’. This is one of those things where researchers came up with some intuition and some idea about this thing they wanted to try and found that it worked well. They then look for an explanation after the fact. So the original explanation for why it works may well be wrong. In this paper - How Does Batch Normalization Help Optimization? - they have an alternative explanation:
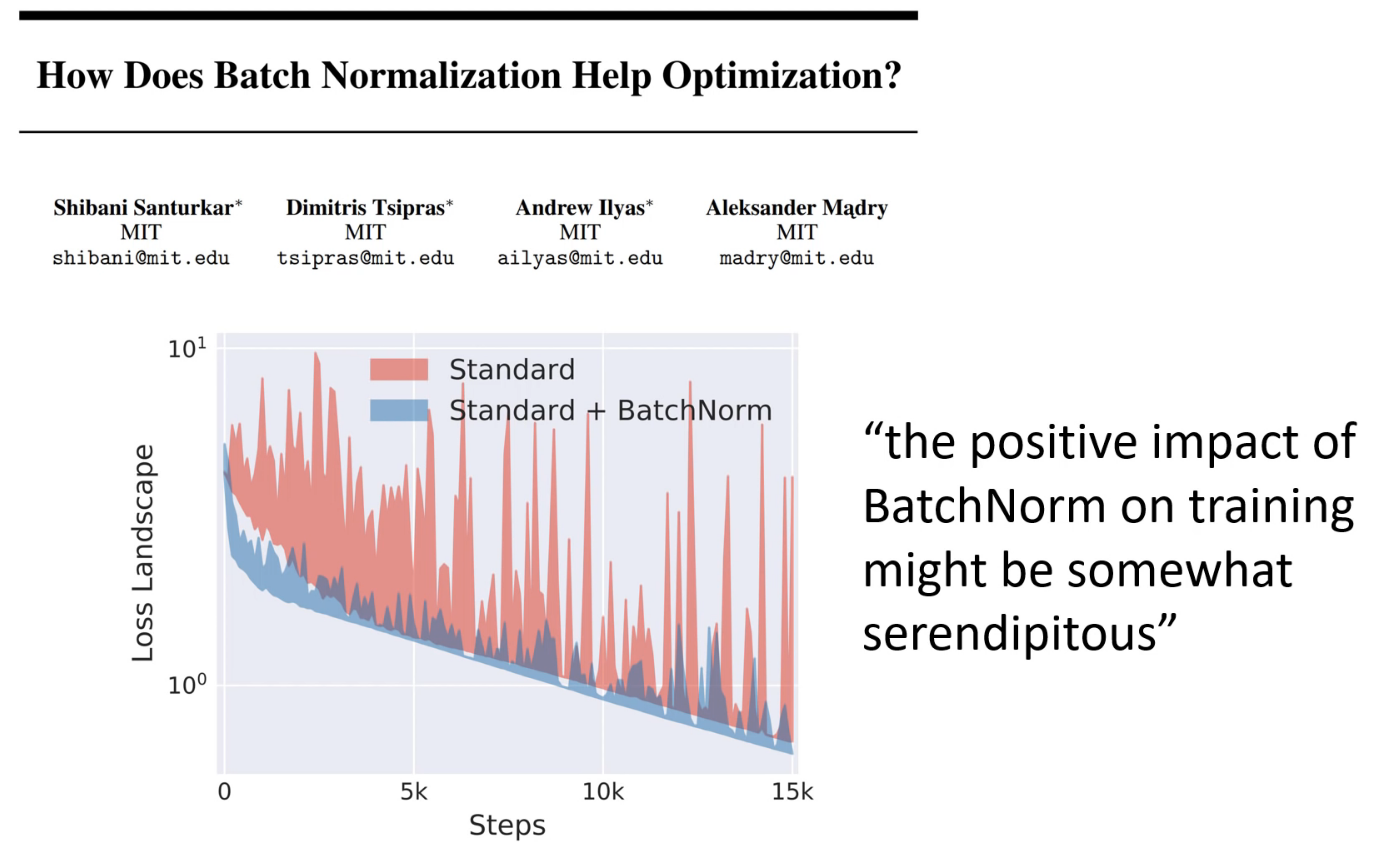
The above is from this paper. The plot represents the ‘loss landscape’ of the network during training. The red line is what happens whn you train without Batch Norm - very very bumpy. The blue line is training with batch norm - a lot smoother. If the loss landscape is very bumpy then your model can get trapped in some awful region of parameter space that it can’t escape from. If it is smoother then you can train with a higher learning rate and hence converge faster.
Other points of view:
- An influential twitter thread on how Batch Norm works that vindicates the Internal Covariate Shift explanation: Twitter thread.
- Blog post with analysis of the different points of view: https://arthurdouillard.com/post/normalization/
Why it works is still debatable and I need to read more into this, but this aside, it seems that the output distribution of the hidden layers in the network is very important for training networks more quickly and with more layers. We already know that these internal distributions are very important for training because of all the research done into the art of initializing neural networks when training from scratch. Getting this wrong can prevent the network from training at all by making gradients vanish or explode. So with this in mind, it makes sense that adjusting these distributions as data flows through the network could improve training.
Data Augmentation
One of the most effective and least studied forms of regularization is data augmentation.
Here is a link to the notebook that explores data augmentation in computer vision: lesson6-pets-more.ipynb.
I recommend reading the fastai documentation on data augmentation for computer vision: vision.transform.
In particular, read the list of transforms.
- The data augmentation you pick should be realistic of what you expect in the dataset and problem domain.
How do convolutions work?
Convolutions are like a special kind of matrix multiply.
Checkout the website: http://setosa.io/ev/image-kernels/:

Post from Matthew Kleinsmith: CNNs from Different Viewpoints. This is a wonderfully concise explanation with great diagrams and hardly any text. The following diagrams are from that post.
Sliding window view:
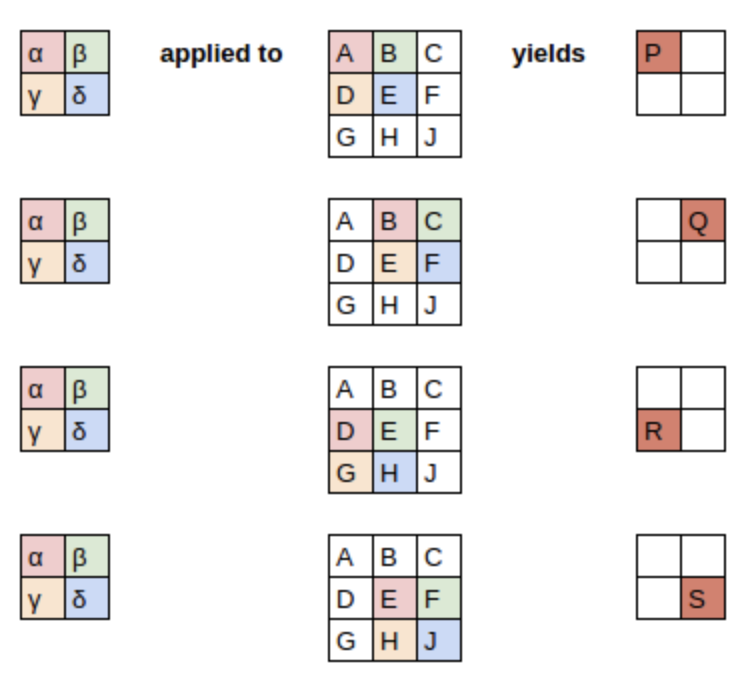
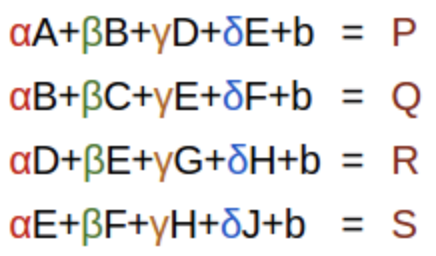
You can alternatively think of it as a a set of linear equations.
You can also think of it as a fully connected neural network. In the following the colour of the links stand for their weight, and the gray links are 0.

You can also interpret it as a matrix multiply:
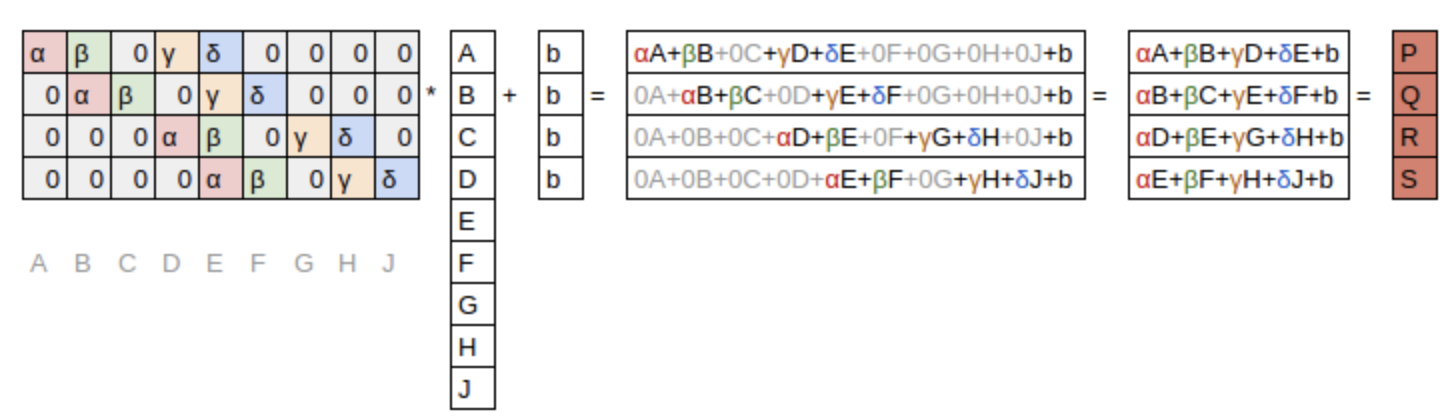
Banded matrix multiply where the colours again stand for the weights. $b$ is a bias term.
We have to also consider padding:

This diagram uses zero padding, but it could be reflection padding or whatever.
So a single convolution kernel is a small matrix of weights (typical sized 3 to 7) and a bias. In a convolutional layer the same convolution is applied to every channel of input. If you take example of a colour image there the image is 3x224x224 in size. The 2D convolutional kernal will be applied to all 3 channels simultaneously and the results from all 3 is summed to produce a single number for each pixel.
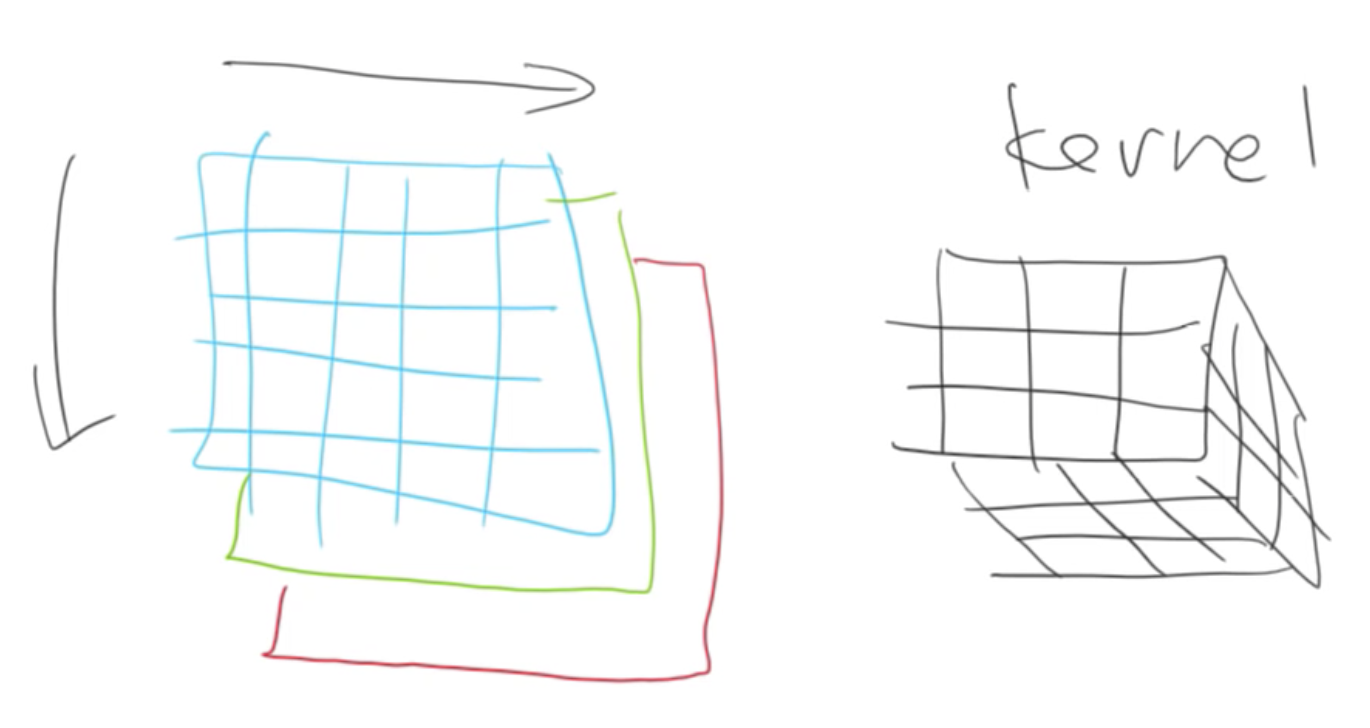
If you have multiple convolutions then you have multiple different outputs. We stack these together to make another tensor:
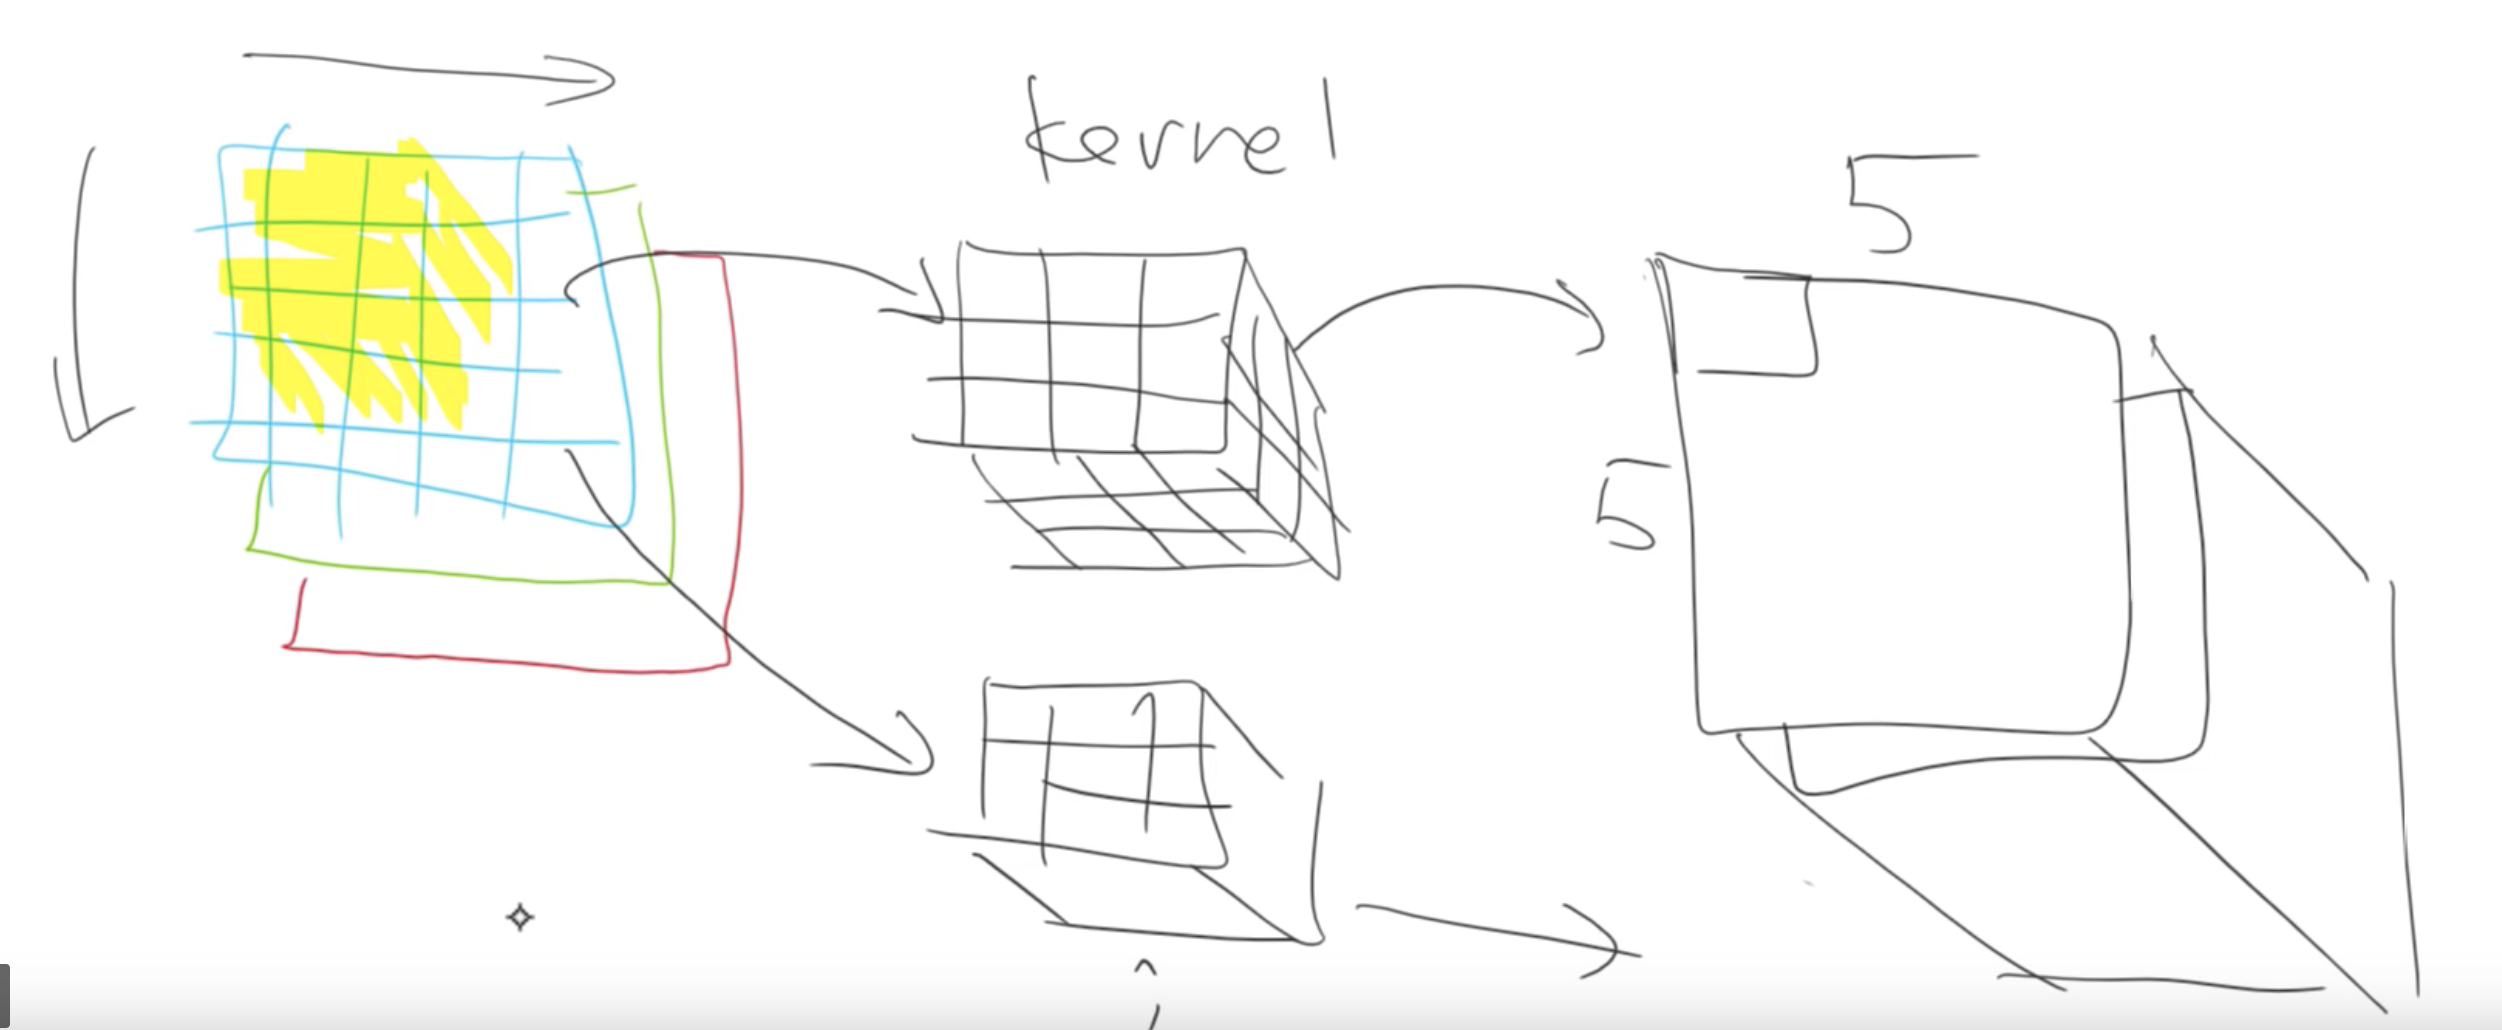
This output can also be fed into another convolution layer, and so on.
In order to avoid our memory going out of control, from time to time we create a convolution where we don’t step over every single set of 3x3, but instead we skip over two at a time. We would start with a 3x3 centered at (2, 2) and then we’d jump over to (2, 4), (2, 6), (2, 8), and so forth. That’s called a stride 2 convolution. What that does is, it looks exactly the same, it’s still just a bunch of kernels, but we’re just jumping over 2 at a time. We’re skipping every alternate input pixel. So the output from that will be H/2 by W/2. When we do that, we generally create twice as many kernels, so we can now have 32 activations in each of those spots. That’s what modern convolutional neural networks tend to look like.
The learn.summary() of a resnet it looks like this:
======================================================================
Layer (type)         Output Shape         Param #    Trainable
======================================================================
Conv2d               [64, 176, 176]       9,408      False
______________________________________________________________________
BatchNorm2d          [64, 176, 176]       128        True
______________________________________________________________________
ReLU                 [64, 176, 176]       0          False
______________________________________________________________________
MaxPool2d            [64, 88, 88]         0          False
______________________________________________________________________
Conv2d               [64, 88, 88]         36,864     False
______________________________________________________________________
BatchNorm2d          [64, 88, 88]         128        True
______________________________________________________________________
ReLU                 [64, 88, 88]         0          False
______________________________________________________________________
Conv2d               [64, 88, 88]         36,864     False
______________________________________________________________________
BatchNorm2d          [64, 88, 88]         128        True
______________________________________________________________________
Conv2d               [64, 88, 88]         36,864     False
______________________________________________________________________
BatchNorm2d          [64, 88, 88]         128        True
______________________________________________________________________
ReLU                 [64, 88, 88]         0          False
______________________________________________________________________
Conv2d               [64, 88, 88]         36,864     False
______________________________________________________________________
BatchNorm2d          [64, 88, 88]         128        True
______________________________________________________________________
Conv2d               [128, 44, 44]        73,728     False
______________________________________________________________________
BatchNorm2d          [128, 44, 44]        256        True
______________________________________________________________________
ReLU                 [128, 44, 44]        0          False
______________________________________________________________________
Conv2d               [128, 44, 44]        147,456    False
______________________________________________________________________
BatchNorm2d          [128, 44, 44]        256        True
______________________________________________________________________
Conv2d               [128, 44, 44]        8,192      False
______________________________________________________________________
BatchNorm2d          [128, 44, 44]        256        True
______________________________________________________________________
Conv2d               [128, 44, 44]        147,456    False
______________________________________________________________________
BatchNorm2d          [128, 44, 44]        256        True
______________________________________________________________________
ReLU                 [128, 44, 44]        0          False
______________________________________________________________________
Conv2d               [128, 44, 44]        147,456    False
______________________________________________________________________
BatchNorm2d          [128, 44, 44]        256        True
______________________________________________________________________
Conv2d               [128, 44, 44]        147,456    False
______________________________________________________________________
BatchNorm2d          [128, 44, 44]        256        True
______________________________________________________________________
ReLU                 [128, 44, 44]        0          False
______________________________________________________________________
Conv2d               [128, 44, 44]        147,456    False
______________________________________________________________________
BatchNorm2d          [128, 44, 44]        256        True
______________________________________________________________________
Conv2d               [256, 22, 22]        294,912    False
______________________________________________________________________
BatchNorm2d          [256, 22, 22]        512        True
There are stacks of convolutional layers and every so often it halves the grid size and doubles the number of channels.
Manual Convolution
Input image:

Convolve with tensor:
k = tensor([
    [0.  ,-5/3,1],
    [-5/3,-5/3,1],
    [1.  ,1   ,1],
]).expand(1,3,3,3)/6
The images has 3 channels so we need to expand the tensor to replicate the kernel 3 times. We also add in an additional unit dimension because PyTorch expects to work with mini-batches always so this way it has the right tensor rank.
You then take that image t and convolve it using PyTorch:
edge = F.conv2d(t[None], k)

CNN Heatmap Example

This is covered in the notebook: lesson6-pets-more.ipynb.
Ethics and Data Science
I won’t cover this here. Instead just watch the video, it’s great: ethics and data science (YouTube)
Jeremy Says…
- Not an explicit “do this” but it feels like it fits here. “One of the big opportunities for research is to figure out how to do data augmentation for different domains. Almost nobody is looking at that and to me it is one of the biggest opportunities that could let you decrease data requirements by 5-10x.” Lesson 6: Data augmentation on inputs that aren’t images 26
- In context of data augmentation: reflection mode padding almost always works best.
- If you take your time going through the convolution kernel section and the heatmap section of this notebook, running those lines of code and changing them around a bit. The most important thing to remember is shape (rank and dimensions of tensor). Try to think “why?”. Try going back to the printout of the summary, the list of the actual layers, the picture we drew and think about what’s going on. Lesson 6: Go through the convolution kernel and heatmap notebook 11
Q & A
-
In what proportion would you use dropout vs. other regularization errors, like, weight decay, L2 norms, etc.? [54:49]:
So remember that L2 regularization and weight decay are kind of two ways of doing the same thing? We should always use the weight decay version, not the L2 regularization version. So there’s weight decay. There’s batch norm which kind of has a regularizing effect. There’s data augmentation which we’ll see soon, and there’s dropout. So batch norm, we pretty much always want. So that’s easy. Data augmentation, we’ll see in a moment. So then it’s really between dropout versus weight decay. I have no idea. I don’t think I’ve seen anybody to provide a compelling study of how to combine those two things. Can you always use one instead of the other? Why? Why not? I don’t think anybody has figured that out. I think in practice, it seems that you generally want a bit of both. You pretty much always want some weight decay, but you often also want a bit of dropout. But honestly, I don’t know why. I’ve not seen anybody really explain why or how to decide. So this is one of these things you have to try out and kind of get a feel for what tends to work for your kinds of problems. I think the defaults that we provide in most of our learners should work pretty well in most situations. But yeah, definitely play around with it.
Links and References
- Link to the lecture video: Lesson 6.
- Parts of my notes were copied from the excellent lecture transcriptions made by @hiromi: Detailed lesson notes.
- Homework notebooks:
- CNNs from Different Viewpoints
- Blog post about different kinds of Normalization.
- Cross-entropy loss
- Lecture on BackProp going deeper into how it works from A. Karpathy: https://www.youtube.com/watch?v=i94OvYb6noo